


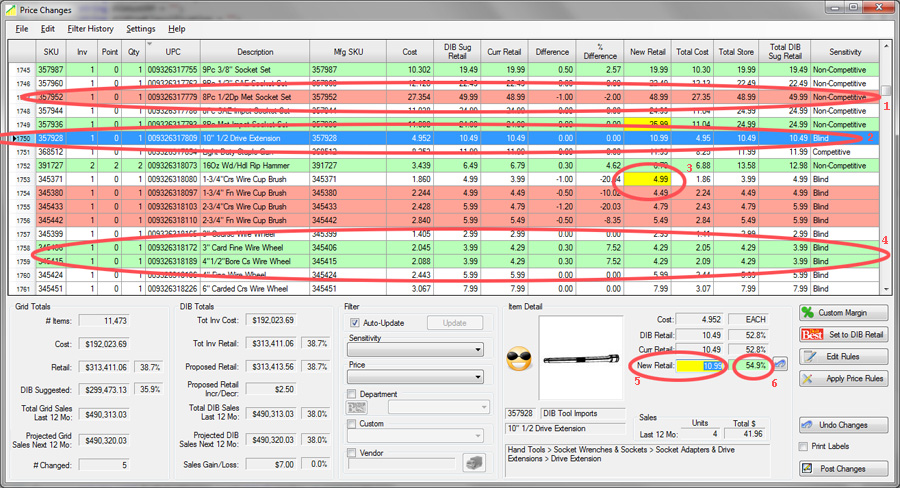
There are six buttons on the Price Changes form.
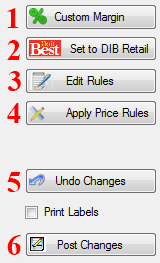
We discussed the "Custom Margin" (1) button in the What If?.
The "Set to DIB Retail" button (2) will set all the items we have selected by our filter to the Do it Best suggested retail. Of course you can always click the "Undo Changes" (5) to revert back to your original retail prices. And remember until you click the "Post Changes" (6) button nothing is applied to your items.
To Edit the Price Rules and Exceptions you click button (3), or select it from the menu. We also used the "Apply Price Rules" button (4) in What If?.
In Profit Manager, you can apply the price rules to every item in the grid, or you can decide to do one gondola, or counter at a time. This is done by creating an Open Do it Best purchase order in RockSolid POS® and adding the items to the purchase order by just scanning them using the Symbol Pocket PC. Then when you click the "Apply Price Rules" button Profit Manager will present this dialog box.
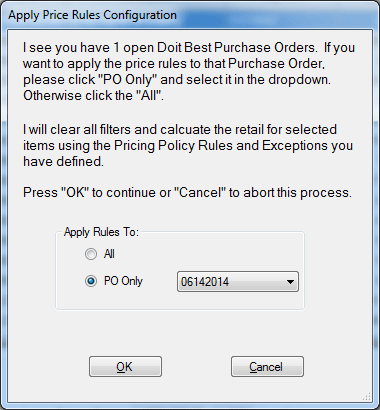
Here you must select if you want to apply the rules to "All" items, or a selected a "Purchase Order". Using the "PO Only" choice is normall only used when you are first starting to use Profit Manager. It helps you control the way you generate changes. The price tickets are printed in the order you have entered them in the PO. After you have updated the entire store you will probably never use the "Purchase Order" choice again.
When you do use a "Purchase Order" to update your retails Profit Manager will clear all filters and calculates new retail using the Pricing Policy Rules and Exceptions for all the items in the selected "Purchase Order".
Just remember, no changes are permanent until you click the "Post Changes" button. You can always click the "Undo Changes" button (5) or just quit the Price Changes module...
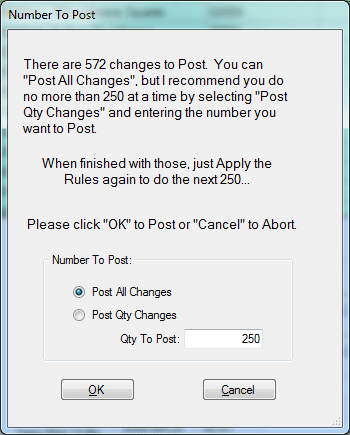
When you click the "Post Changes" button (6) and you will be presented with a "Number to Post" dialog box (below). If you are using a "Purchase Order" go ahead and select "Post All Changes" as show here.
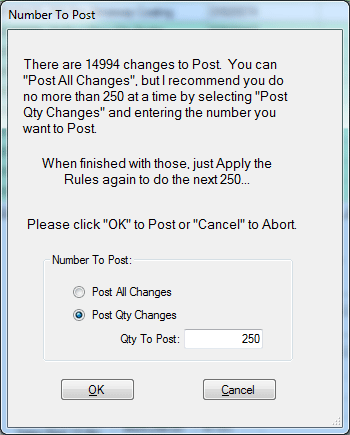
If however you are not using a "Purchase Order", you will see a screen like the one below. Here I suggest you only post 250 at a time. That will make it easier to manage the price changes, but that is entirely up to you.
Note: When the Dymo printer runs out of labels the last label is often black on part of the label. Windows is pretty good about reprinting the bad label after loading a new roll, but just check to make sure you received a good one...
I'm sure by now you have noticed the colors on the rows of the Price Changes grid. There are five colors for the rows: White, Green, Red, Yellow, and Blue. These are explained in the table below.
| White | Your Retail is EQUAL to Do it Best suggested retail. |
| Red (1) | Your Retail is LESS than Do it Best suggested retail. |
| Green (4) & (6) | Your Retail is HIGHER than Do it Best suggested retail. |
| Yellow (3) & (5) | The retail has been edited, either manually or by Profit Manager. |
| Blue (2) | This is the selected row in the grid. |
With the exception of Blue, these colors also show up in the "New Retail" and "New Retail Margin" fields.

 Price Changes: Icons